The excitement of designing your very own website is un-paralleled and the sense of achievement is high…until you update your WordPress theme.
Next thing you know your design & layouts have changed or look considerably different to before.
So you perhaps start searching for answers and then you find out about these things called WordPress child themes!
But your probably wondering:
What the heck is a child theme?
Well to put is simply, a child theme is core theme that inherits the styling & functionality of your original theme (parent theme).
Child themes are therefore recommended for customisation of your original theme.
Exactly why is it recommended?
Well…
The core reasons for using a child theme are:
- If you modify your original (parent) theme directly and it is then updated, your modifications may be lost. By using a child theme you will ensure that your modifications are preserved
- Modifications to an original (parent) theme may break the code, rendering the site broken
- Using a child theme can speed up design & development time. (We will go into more detail how further on)
- Using a child theme is a great way to learn about WordPress design & development in particular customising the CSS (Cascading Style Sheet)
For new web designers, getting your head around using a child theme may seem daunting.
There’s good news though!
Once you have created your first one and have it functioning as it should, it will easily become normal practise.
Our web design agency uses the Divi theme from Elegant Themes for every client website and our very first step is to upload our standard Divi Child Theme.
So what steps do you need to take for creating a child theme?
As it turns out:
We have 3 different methods for you to choose.
For those using the Divi theme, you can choose from any of the following methods. Everyone else not using Divi can follow method #2 or method #3 and follow the recommended steps to suit the parent theme your using.
Ok so if you’re using Divi and you would like to upload a child theme the standard way but without having to produce the files, then follow this first method.
1. Download Our Custom Divi Child Theme
Our custom Divi child theme is simply a zip file which you will upload the same way as you would your original parent theme.
It contains the required:
- Functions.php file for linking the Divi child theme to your parent Divi theme
- style.css file to add your own CSS for customising your website design
- Screenshot.png which is an image for showing the child theme within the installed WordPress theme library
Plus additionally:
- Header.php file for adding any customisation to your website header elements
- Login Editor so you can edit the WordPress Login page with a relevant logo & text
When you download the zip file, you can simply upload that straight into your themes dashboard & activate it.
Upon activation, your website should look exactly the same.
You will notice the change in footer elements that should replicate your Site Title.
You now have the ability to add custom CSS to the style.css file inside of the child theme editor or via FTP.
To edit the login page, simply head to the Divi Theme Customiser ( Divi > Theme Customiser > Login Editor ) and select the login editor button.
So that is a pretty straight forward method for installing & activating a Divi child theme that has options for customising not only the CSS styling, but also your Divi Header & Dashboard Login.
2. Using A Plugin
If you’re not fussed on editing the Header & Footer of your site, then we suggest using this simple plugin Child Theme Configurator from the WordPress depository.
Best of all…
Uploading the plugin will quickly allow you to setup a Divi child theme.
Child Theme Configurator is a fast and easy to use utility that allows you to analyse any theme for common problems, create a child theme and customise it beyond the options of the Customiser.
Designed for WordPress users who want to be able to customise child theme stylesheets directly, Child Theme Configurator lets you easily identify and override the exact CSS attributes you want to customise.
3. Manually Creating Your Own (Full Tutorial)
In this tutorial, I will be creating a child theme for the Divi theme. Of course the same process applies for any theme you’re working with. We just use Divi on 99% of our projects.
The steps are relatively easy and you will have a good understanding of how a child theme is structured to increase your web development knowledge.
The process will involve:
- Creating a child theme folder
- Create a style.css file with the relevant child theme info
- Creating a functions.php file and adding the required code to en-queue the parent theme. In this instance Divi.
- A screenshot.jpg file for displaying child theme logo.
Alright so let’s dive in…
First of all anywhere on your desktop, create a new folder & name it “divi-child”
Step 1 done!
Now we need to create a style.css file
There are two ways we can go about this.
For users with experience using source code editors, we prefer to use a software program called Brackets.
As we build our projects using a Mac, we find Brackets works really well.
For those with zero experience using software programs such as Brackets, then I suggest using a standard TextEdit (Mac) or TextEditor (Windows).
All options will get the desired result.
Ok so with your code / text editor open, we need to create a style.css file.
Copy & paste the code below into the code / text editor.
/*---------------------------------------------------------------------------------

 Theme Name:   My Divi Child Theme
 Theme URI:    http://www.mysite.com
 Description:  A Divi Child Theme
 Author:       My Name
 Author URI:   http://www.mysite.com
 Template:     Divi
 Version:      1.0.0

------------------------------ ADDITIONAL CSS HERE ------------------------------*/
Once pasted in…
Go ahead & change out the theme name and author information based on your details.
There is one important note to point out!!
The Template name must be the parent theme name. In this instance it will be remain “Divi”.
Ok so once you have those details changed, you can save as style.css
Move this file inside of the “divi-child” folder we created in step 1
Step 2 done!
To en-queue the parent theme, we need to create a function.php file & add in a particular line of code.
So go ahead & open a new file inside of your code / text editor.
Copy & paste in the code below
<?php
function ds_ct_enqueue_parent() { wp_enqueue_style( 'parent-style', get_template_directory_uri() . '/style.css' ); }

function ds_ct_loadjs() {
  wp_enqueue_script( 'ds-theme-script', get_stylesheet_directory_uri() . '/ds-script.js',
        array( 'jquery' )
    );
}
?>
Once you have done this, all you need to do is save as functions.php
Once saved, move this file inside of the divi-child folder as well.
Ok so that’s step 3 finished.
Moving ahead now!
To show a logo or image of your child theme in the theme directory, we need to add a screenshot.jpg file preferably 800px wide by 600px high.
So have a logo or image created similar to our below using those dimensions and save as screenshot.jpg
Once saved, also move this file inside of the divi-child folder.
And that is step 4 done.
Your Divi-Child folder should look like this:
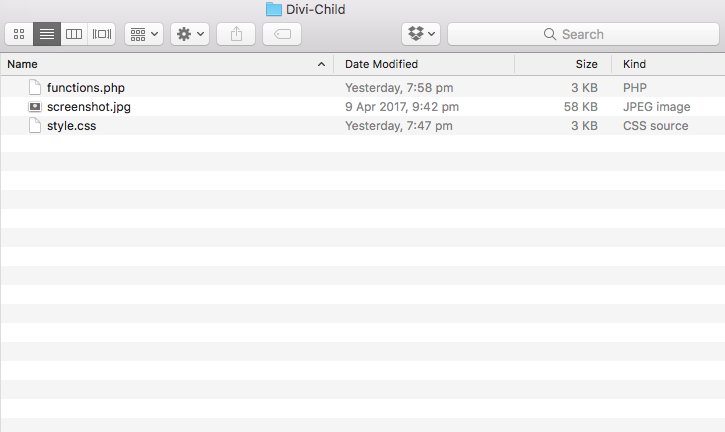
All that’s left to do is to compress the divi-child folder into a .zip file and upload into your themes directory within WordPress, then activate it.
Compressing divi-child folder & uploading into WordPress.
So using a Mac, I simply Control + Click on the divi-child folder then click on compress.
The Mac then displays a divi-child.zip file
With the relevant style.css file, functions.php file, screenshot.jpg file inside of the divi-child.zip file you now have a child theme ready to upload into WordPress just like any other parent theme.
So with a parent Divi theme installed & activated, go ahead and upload your Divi-Child.zip file.
After installation is complete, activate the child theme and you now have a website running Divi as the framework using a Divi child theme for customisation purposes.
Conclusion
So there you go… 3 ways to implement a child theme for your website.
Now in case you are wondering, Yes a child theme can be installed and activated on a live / exisiting website already in use.
You will just need to make a note of any customisation changes you have made to the parent theme (things like menu structure, fonts, custom CSS etc) so you can apply those to the child theme.
I also recommend installing a child theme on an exisiting website under a staging environment.
Depending on your host, setting up staging environments can be done within your Cpanel or you can use a plugin.
Elegant Themes has an in-depth tutorial on creating a WordPress staging site for development & testing.
Now I’d like to hear what you think:
Let me know what method your going to try.
Ready to create your own child theme files?
Or maybe you will opt into our own child theme download.
Either way, leave a comment below right now!